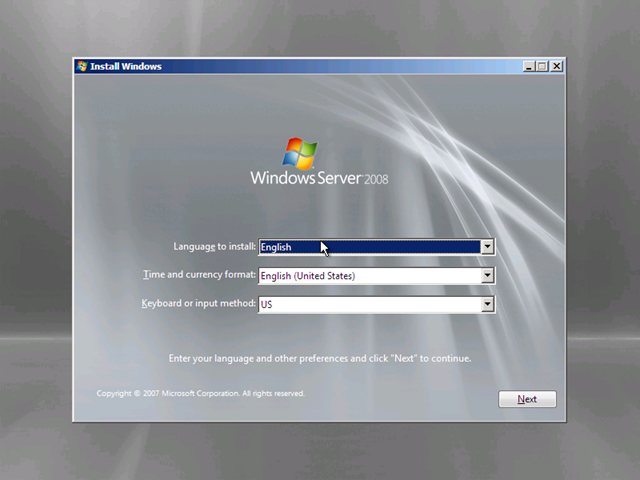
Olá, mundo!

Welcome to WordPress.com. This is your first post. Edit or delete it and start blogging!

Publicado em Sem categoria | Deixe um comentário

Instalação independente do MOM 2005 Reporting

Segue uma dica bem legal para fazer a instalação independente do MOM Reporting:

Installing MOM 2005 and MOM Reporting on SQL 2005

OK, I have now completed this and have figured out the procedure. Firstly, you will need the SP1 slipstream copy of MOM 2005.

– Install SQL 2005 and Reporting Services 2005
– Install MOM 2005, no issues here
– Apply the 2 MOM hotfixes (KB913801 and KB913812)
– Install MOM Reporting using the following run command:
       msiexec /i <path>\MOMReporting.msi PREREQ_COMPLETED=1

– IMPORTANT – At the virtual directory selection screen in the MOM Reporting setup, uncheck the automatic box and enter ‘ReportServer’ in the 1st box and ‘Reports’ in the second (by default). You will then be able to continue on through the setup.

– Install the final hotfix (KB915785)

Fonte: http://myitforum.com/cs2/blogs/adominey/archive/2006/04/06/19671.aspx

[ ]’s
Jamal Ibrahim

Publicado em Sem categoria | 6 Comentários

Microsoft Forefront Client Security – Dicas e Truques!

Olá pessoal! Estou um pouco sumido do blog, é verdade… Mas é por pouco tempo! =)

Eu estou empenhado em um projeto de planejamento e arquitetura do Microsoft Forefront Client Security.

Estou encontrando muitos desafios e aprendendo bastante! Agradeço ao amigo Jess Huber (MS Support Engineer) pelas ajudas com os históricos do FCS e principalmente ao amigo Vinicius Canto (MVP) que tem me ajudado bastante com os scripts!

Para quem está começando a mexer com o FCS, vou deixar a minha dica! Não deixe de visitar estes links:

Microsoft Forefront Client Security
http://technet.microsoft.com/en-us/library/bb432630.aspx

Forefront Client Security Support Blog
http://blogs.technet.com/fcsnerds/

Forefront Client Security Team Blog
http://blogs.technet.com/clientsecurity/

Yaniv Feldman – MVP
http://blogs.microsoft.co.il/blogs/yanivf/

Microsoft Windows Server Update Services
http://technet.microsoft.com/en-us/wsus/default.aspx

Search WSUS Product Team Blog
http://blogs.technet.com/wsus/

PatchAholic…The WSUS Blog!
http://msmvps.com/blogs/athif/

The WSUS Support Team Blog
http://blogs.technet.com/sus/

Blog ADM de Redes
http://blogadmderedes.spaces.live.com/

MVP – Vinicius Canto
http://viniciuscanto.blogspot.com/

Logo mais voltarei com algumas dicas e macetes que encontramos na implementação do Forefront Client Security.

[ ]’s
Jamal Ibrahim, MCT
Microsoft Tips & Tricks
http://jamal-ibrahim.spaces.live.com/

Publicado em Sem categoria | 1 Comentário

Como Instalar o Windows Server 2008 Passo a Passo

Neste guia prático estão todos os procedimento de como instalar o Windows Server 2008.


Recursos utilizados:

  • Hyper-V para a virtualização da maquina virtual com W2k8
  • Windows Server 2008 Enterprise

Pré-Requisitos:

Componentes

Requerimentos

Processor

• Minimum: 1GHz (x86 processor) or 1.4GHz (x64 processor) • Recommended: 2GHz or faster Note: An Intel Itanium 2 processor is required for Windows Server 2008 for Itanium-based Systems

Memory

• Minimum: 512MB RAM • Recommended: 2GB RAM or greater • Maximum (32-bit systems): 4GB (Standard) or 64GB (Enterprise and Datacenter) • Maximum (64-bit systems): 32GB (Standard) or 2TB (Enterprise, Datacenter and Itanium-based Systems)

Available Disk Space

• Minimum: 10GB • Recommended: 40GB or greater Note: Computers with more than 16GB of RAM will require more disk space for paging, hibernation, and dump files

Drive

DVD-ROM drive

Display and Peripherals

• Super VGA (800 x 600) or higher-resolution monitor • Keyboard • Microsoft Mouse or compatible pointing device


Cenários de Upgrade:

Se você estiver usando:

Você pode fazer upgrade para:

Windows Server 2003 Standard Edition (R2, Service Pack 1 or Service Pack 2)

Full Installation of Windows Server 2008 Standard Edition

Full Installation of Windows Server 2008 Enterprise Edition

Windows Server 2003 Enterprise Edition (R2, Service Pack 1 or Service Pack 2)

Full Installation of Windows Server 2008 Enterprise Edition

Windows Server 2003 Datacenter Edition (R2, Service Pack 1 or Service Pack 2)

Full Installation of Windows Server 2008 Datacenter Edition


Procedimento:

  • Insira o disco de instalação do Windows Server 2008 no seu drive de DVD ou utilize o arquivo ISO caso esteja efetuando a instalação em uma maquina virtual. Se você não tiver a mídia de instalação do Windows Server 2008, você pode fazer o download da versão Trial no site: Microsoft Tips & Tricks – Microsoft’s Windows 2008 Server Trial website.
  • Reinicie o computador.

 
Selecione o idioma a ser instalado e as outras configurações regionais. Faça a sua seleção e clique no botão Next.

 
Clique no botão Install Now para iniciar o processo de instalação.

 
Selecione a versão a ser instalada e clique no botão Next.


Selecione a opção “I accept the license terms” e clique no botão Next.

 
Na tela "Which type of installation do you want?" clique na única opção disponível – Custom (Advanced).

 
Na tela "Where do you want to install Windows?", selecione a opção “Disk 0”, e clique no botão Next.


Aguarde a cópia dos arquivos ….


Aguarde a finalização da instalação ….


Após o restart do servidor, o Windows Server 2008 irá solicitar que você altere a senha. Clique no botão OK


Adicione uma senha que tenha uma alta complexidade e prossiga …


Clique no botão OK para finalizar a instalação.


Pronto, instalação concluída com exito.

Mais informações: http://technet.microsoft.com/en-us/windowsserver/bb310558.aspx

Espero ter ajudado! 🙂

[ ]’s
Jamal Ibrahim
Microsoft Tips & Tricks
http://jamal-ibrahim.spaces.live.com/

Publicado em Sem categoria | Deixe um comentário

Update Rollup 8 for Exchange Server 2007 Service Pack 1


We have released Update Rollup 8 for Exchange Server 2007 Service Pack 1 (KB 968012) to the download center. The release of the rollup via Microsoft Update will happen on May 26.

As in the previous rollups, we have done a mix of product improvements (aka Critical Design Change Requests) and bug fixes. A few key ones which I would like to call out are as follows:

  1. KB 969690 – We have fixed the bug introduced in Update Rollup 7 which caused the sender of the Delivery Status Notification (DSN) to be unresolved.
  2. Disable kernel mode authentication in Windows Server 2008 for CAS servers – As documented here, it was required to manually take the additional step to configure the CAS servers running Windows Server 2008 to disable kernel mode authentication. Starting this rollup, the installer will configure this for you.
  3. X-Header promotion to named properties- Change to the way X-headers are promoted to named properties. More on this in Jason Nelson’s blog post Named Properties, X-Headers, and You.
  4. KB 961606 – We have fixed a bug where Outlook Web Access (OWA) users may find that the font size of plain text messages is extremely small on third-party Web browsers.

KB 968012 has more details about this release and a complete list of all fixes included in this rollup.

As a follow up to the Exchange Server 2007 Service Pack 2 (SP2) announcement, all fixes in this Update rollup and the previous ones we have released for Exchange Server 2007 will be included with Exchange Server 2007 SP2. We will have a blog post soon which covers:

  • When update rollups can be expected for Exchange 2007 SP2.
  • Support plans for Exchange 2007 SP1 which will be in support as per the timeline in Microsoft’s Service Pack Support Policy.

As always, the Exchange Software Updates forum is available to provide help if you encounter issues in the updates we release for Exchange. We have staffed the forums with engineers monitoring the forum ready to assist you and request you to utilize that mode instead of asking for help via comments on this blog.

– Exchange Customer Experience team

Fonte: http://msexchangeteam.com/archive/2009/05/19/451371.aspx

[ ]’s
Jamal Ibrahim
Microsoft Tips & Tricks
http://jamal-ibrahim.spaces.live.com/

Publicado em Sem categoria | Deixe um comentário

How to install a Loopback Adapter in Windows 7

The Microsoft Loopback adapter is a testing tool for a virtual network environment where network access is not available or to use with Virtual Server 2005. You can bind network clients, protocols, and other network configuration items to the Loopback adapter, and you can install the network adapter driver or network adapter later while retaining the network configuration information. You can also install the Loopback adapter during the unattended installation process.

To install Microsoft Loopback adapter in WIndows 7

1. Click Start – Search for cmd, right-click cmd and select “Run as Administrator”
2. From the command prompt, run “hdwwiz.exe“. This should launch the “Add Hardware Wizard“. Click Next.


3. Select “Install the hardware that I manually select from a list (Advanced)” and click Next.


4. Now from the list select Network Adapters and click Next.


5. Under Manufacturers, select Microsoft and select “Microsoft Loopback Adapter” under Network Adapter and click Next. This should start the installation. Click Finish when the installation completes.

To confirm the loopback adapter installed, right-click Computer, select properties. Click Device Manager and expand Network Adapters and you can see the Loopback adapter installed there.

That’s it!

[ ]’s
Jamal Ibrahim
Microsoft Tips & Tricks
http://jamal-ibrahim.spaces.live.com/

Publicado em Dicas | Deixe um comentário

Exchange Server Remote Connectivity Analyzer

Para quem trabalha com Exchange Server, com certeza vai gostar deste utilitário.

Testes que podem ser executados:

Microsoft Exchange ActiveSync Test

This test will simulate the steps a mobile device uses to connect to an Exchange Server using Exchange ActiveSync


Microsoft Exchange ActiveSync AutoDiscover Test

This test will walk through the steps a mobile device uses to connect to the AutoDiscover Service


Microsoft Office Outlook 2007 Autodiscover Connectivity Test

This test will walk through the steps Microsoft Office Outlook 2007 uses to connect to Autodiscover


Microsoft Office Outlook 2003 RPC/HTTP Connectivity Test

This test will walk through the steps Microsoft Office Outlook 2003 uses to connect via RPC/HTTP


Inbound SMTP Email Test

This test will walk through the steps an Internet e-mail server uses to send inbound SMTP email to your domain

Link: https://www.testexchangeconnectivity.com/

[ ]’s
Jamal Ibrahim
Microsoft Tips & Tricks
http://jamal-ibrahim.spaces.live.com/

Publicado em Dicas | Deixe um comentário

Keeping High Availability with Forefront TMG’s ISP Redundancy Feature

Overview

Today, more and more businesses rely on their Internet Service Providers link (or ISP) to handle their outside Internet world communications. Sending emails, browsing the web and any other web related actions are essential business infrastructure services that are only available as long the ISP line is up and running.
Keeping a stable, available and reliable outside Internet connection is one of the critical tasks on every administrator’s check list.
Forefront TMG provides a new capability called ISP redundancy which basically, enables utilizing not one, but two ISP links for external connectivity, either for traffic load balancing or as a failover backup.

This post is an introduction to the ISP Redundancy feature. It covers the basic setup steps, configuration, monitoring and some caveats and tips and tricks. It assumes you have access to two different ISPs lines and a TMG server hardware that has at least two available NICs.
This article is based on the Forefront TMG Beta2 release; later editions may vary in their User Interface and feature availability.

Important: ISP Redundancy is currently not supported in production environments. It can be used in non-production deployments.

Configuring ISP Redundancy

Once you’ve passed the initial Forefront TMG setup steps, either by manual configuration or by using the Getting Started Wizard, from Forefront TMG’s Management console tree open up the Networking pane and use the ISP Redundancy tab and click Enable ISP Redundancy to turn this feature on. Clicking Enable ISP Redundancy will open up the configuration wizard.
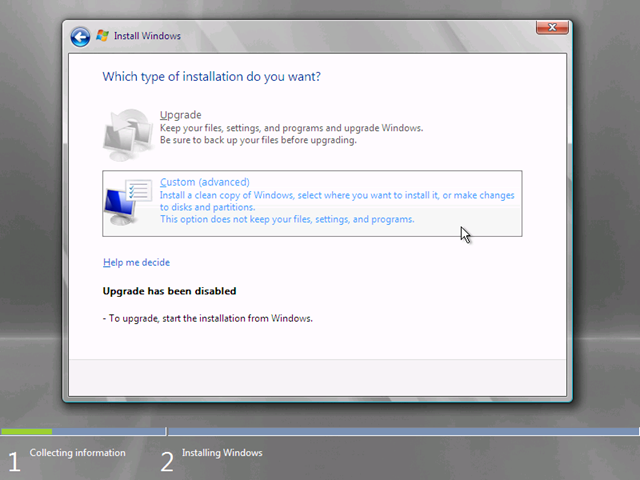
The first configuration step is choosing between two modes of operations:


Image 1 – Choosing ISP redundancy method.

Load Balancing – Network connections are distributed between the two active ISP lines. Load factor between the two links can be configured by sliding the percentage rule from one end to the other (See image 2). Distribution levels are determined by the actual number of connections.

Failover – Network connections are routed through the primary ISP Link. The secondary links stays inactive up until the master link connection is broken or disconnected. If the master connection fails the secondary link becomes active by routing the outbound traffic through the second ISP Link. The
secondary link will stay active up until the primary link comes back again.


Image 2 – Setting Load Balance Factor for the Load Balance Method

The next steps are similar for both methods. They basically ask for a link name and the specific default gateways and subnet masks of the two ISP links. Within these settings, explicit route destinations can be configured for each ISP link as well. Explicit route definitions, which are only available in load balancing mode, can be useful for defining the DNS servers of both ISPs to be routed explicitly through their respective ISP link. E.g. If we have ISP1 and ISP2 and they have different DNS servers , we’ll configure ISP1 Link to explicitly route the DNS ip address from this specific link (by using the Explicit Route Destinations buttons). This will make sure Forefront TMG is not querying DNS2 for a name resolution by using ISP1’s link. More explicit link traffic control can be set by using another one of Forefront TMG’s new Network rules capabilities, see Tips and Tricks section down below for more information.
* Please note that ISP redundancy will function properly if and only if only one of the external NICs has its default gateway defined in the NIC properties.


Image 3 – Configuring the 1st link as the master link.

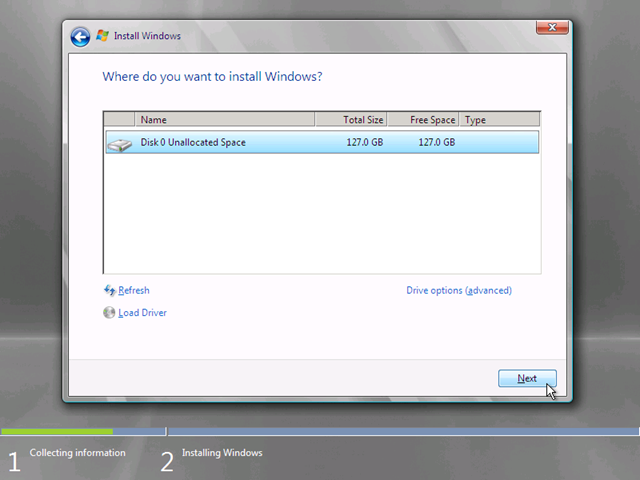
Once we’ve configured the mode of operation and the two ISP links, we can go on and finalize the settings by confirming our ISP redundancy settings presented in the last wizard step.

We may also be required to apply the changes we’ve just configured and wait for the changes to fully apply. At this point it would be a good idea to check the Web access connectivity by using a client and our Forefront TMG as the gateway or proxy.

Monitoring

ISP redundancy comes with a status dashboard that can be viewed by clicking on Forefront TMG’s console tree Networking node and selecting the ISP redundancy tab (see image below)

The ISP Redundancy pane is composed of two main sections.

The ISP redundancy dashboard upper part is a graphical interface for showing the current ISP link’s state.
A blue line represents an enabled and active link.
A red line represents an active but disconnected link.
A gray line represents a disabled link.
The lines on the left side represent configuration health and internal issues related to Forefront TMG, where the lines on the right side represent outbound connectivity status.

The lower part of the dashboard is used to show the statistical distribution when Load Balancing mode is being used or a simple “which line is currently active” for failover mode.
Note that in Load Balancing mode the statistics shown represent actual traffic bandwidth load passing through.


Image 4 –ISP Redundancy status dashboard when working in Failover mode.

Image 5 – ISP Redundancy status dashboard when working in Load Balancing mode.

Alerts

ISP redundancy comes with five new types of alerts:
ISP Link address missing – No IP address configured on a network adapter of the Forefront TMG computer in the external network can be associated with the ISP Link.
ISP Link is active – Triggered when an ISP link is active, e.g. traffic can or is passing through.
ISP link is available – Triggered when an ISP link is available.
ISP Link is unavailable – Triggered when an ISP link is unavailable or disconnected.
Both ISP Links are unavailable – Both ISP links are detected to be unavailable
A Forefront TMG admin can utilize these alerts to keep track of the current outbound connectivity health, either by going to the alerts dashboard (from the Forefront TMG management console tree Monitoring node and selecting the alerts tab) or by configuring an email alert action. More information on monitoring and alerts can be found here.

Tips and Tricks
Diverting traffic to a specific ISP Link by using NAT rules

We saw before that we can define explicit IP addresses to be diverted through a specific link. But there are cases where we are required to divert specific internal network subnets through a specific ISP link.
Forefront TMG introduces new network rules settings that can be used to configure these requirements. For example, if we want a subnet to be routed through a specific link we’ll can do the following: Set up a new network rule by clicking on the Forefront TMG console networking node and clicking on the Create a network rule. We’ll set the source and destination for the network, define it as a NAT and pick the Use selected IP addresses for each network option on the NAT Address Selection step.


Image 6 – Specifying IPs for each network.

This option enables defining the specific ISP Link IPs by pressing the Select IPs button


Image 7 – Selecting specific IPs for a specific network.

And hitting ok should do the trick. That way we make sure that the specific internal network that was defined in the source step of this rule, would only go out using the 10.50.2.212 IP.
We can also consider setting the load balance to 90%/10% in favor of the strong ISP link so that regular traffic would mostly go through the strongest link.

Caveats and Troubleshooting

There are some things that are either not ready in this beta version or require specific configuration to work properly that you should be aware of when using the ISP redundancy feature.

· One and only one of the Ethernet cards being used by the ISP feature can have their gateway properties defined by the NIC properties. The other card gateway would be defined from the ISP Redundancy configuration properties step.

· Network rules override ISP redundancy settings. For example, when using Load Balancing mode, if a network rule routes specific internal subnet through ISP1, and there is a problem with ISP1’s connectivity, that specific sub network would not be routed to ISP2.

· The ISP Redundancy configuration steps also have the option of simulating a broken link or forcing Forefront TMG to mark it as active. This can be useful for simulating a broken connection to test the system’s reactions or to make sure problematic links are still being defined as active.

· Use the logging tab (under Forefront TMG’s management console tree Logs and Reports node) for network activities or ISP redundancies own monitoring dashboard to understand the system’s current state.

· Post your issues and questions to relevant TAP or beta distribution list.

This article goal was to provide a basic overview of the ISP Redundancy feature. For any issues, question, suggestion don’t hesitate to send your feedback to the TAP or Beta distribution list.

Roiy Zysman
TMG’s End to End Scenarios Team.

Fonte: http://blogs.technet.com/isablog/archive/2009/02/16/keeping-high-availability-with-forefront-tmg-s-isp-redundancy-feature.aspx

[ ]’s
Jamal Ibrahim

Publicado em Dicas | Deixe um comentário

MCT Summit 2009 – Brasil

O encontro anual dos MCTs (Microsoft Certified Trainers) no Brasil será realizado em uma parceria do Grupo de Usuários MCT Brasil e o time de Microsoft Learning de LatAm e Brasil!
Você que já é MCT, junte-se a nós! É certificado, mas ainda não sabe como evoluir na carreira Microsoft? Assista a última palestra do primeiro dia, aberta a todos os profissionais certificados!
Já se inscreveu no evento? Após a validação de sua credencial MCT, você terá acesso ao site de apoio ao Summit. Neste site você vê informações como o link para pagamento do registro, hotéis recomendados e lista de inscritos!


PAGUE R$ 120,00 E LEVE U$ 120.00!

Pagando a taxa de registro de R$120,00 e comparecendo ao evento, você leva 3 vouchers de 50% de desconto em exames Microsoft! Pague 120 reais e leve 120 dólares em descontos!!

Informações

Datas: 04 e 05 de abril (sábado e domingo)
Local: Auditório Microsoft – Av Nações Unidas 12901 -Torre Norte 31º andar – São Paulo
Hospedagem: Por conta do participante. Incentivamos que os participantes que não morem em São Paulo combinem de dividir quartos nos hotéis da região.
Registro/Pagamento: O registro e pagamento para o evento podem ser feito neste site.
Palestra para MCPs: A última palestra do dia 04, Evoluindo na Carreira Microsoft, está aberta a todos os profissionais certificados e é gratuita. Inscrições aqui (link em breve).
Período para Inscrições: até 20 de março. Assim poderemos preparar o evento de forma a atender ao número de inscritos.

Mais informações: http://www.mctsummit.com.br

[ ]’s
Jamal Ibrahim

Publicado em Eventos | Deixe um comentário

Microsoft Deployment Toolkit 2010


Hoje foi disponibilizado o download do MDT 2010. Com ele, é possível agilizar e facilitar o processo de deployment de sistemas operacionais e aplicações. Entre as novas funcionalidades estão incluídas: gerenciamento de driver flexível, processamento de transações otimizado, e acesso a distribution shares de qualquer local.

Deploy Windows 7 beta with Microsoft Deployment Toolkit 2010. Join the beat and download MDT 2010 now at http://connect.microsoft.com.
MDT 2010 is the next version of Microsoft Deployment Toolkit, a solution accelerator for operating system and application deployment. New features like flexible driver management, optimized transaction processing, and access to distribution shares from any location simplify deployment and make your job easier. Deploy faster and easier with MDT 2010. Join the beta now.
Tell us what you think! Join the beta and send us your honest feedback. We appreciate your input.
Microsoft Deployment Toolkit is the fourth generation deployment accelerator from Microsoft. It is the recommended process and toolset to automate desktop and server deployment. MDT benefits you by providing:

  • Detailed guidance and job aids for every organized role involved with large-scale deployment projects.
  • Unified tools and processes required for desktop and server deployment in a common deployment console and collection of guidance.
  • Reduced deployment time, standardized desktop and server images, along with improved security and ongoing configuration management.

Tell your peers about MDT 2010! Please forward this mail to anyone who wants to learn more about Microsoft Deployment Toolkit.

[ ]’s
Jamal Ibrahim
Microsoft Tips & Tricks
http://jamal-ibrahim.spaces.live.com/

Publicado em Dicas | Deixe um comentário